• 2013-227.240
    Air Force Museum of New Zealand
    Negative from the Laurence Walter Tarr personal collection. Local men and women standing in front of Hudson NZ2016. Believed to be at Nausori, Fiji.
    Tarr
    Air Force Museum of New Zealand
    Fiji
    Nausori
    Hudson
    NZ2013
    NZ2016
  • MUS0005327
    Air Force Museum of New Zealand
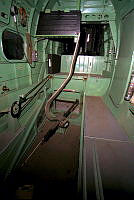
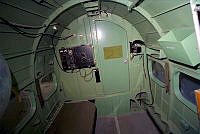
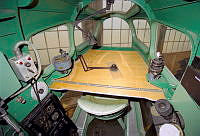
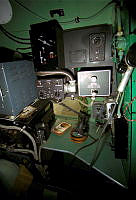
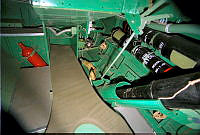
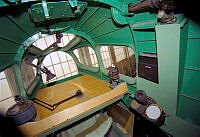
    Looking aft inside the cabin of Hudson NZ2013, showing the ventral gunner's position and the Dorsal turret base. No. 2 Hangar. Air Force Museum of New Zealand.
    Air Force Museum of New Zealand
    Hudson
    NZ2013
  • MUS0005326
    Air Force Museum of New Zealand
    Starboard inside of the cabin of Hudson NZ2013. No. 2 Hangar. Air Force Museum of New Zealand.
    Air Force Museum of New Zealand
    Hudson
    NZ2013
  • MUS0005325
    Air Force Museum of New Zealand
    Interior view of the cabin, looking forward, in Hudson NZ2013. No. 2 Hangar. Air Force Museum of New Zealand.
    Air Force Museum of New Zealand
    Hudson
    NZ2013
  • MUS0005324
    Air Force Museum of New Zealand
    Parachute, flares and trailing aerial winch in the cabin of Hudson NZ2013. No. 2 Hangar. Air Force Museum of New Zealand.
    Air Force Museum of New Zealand
    Hudson
    NZ2013
  • MUS0005323
    Air Force Museum of New Zealand
    Navigator's table in the nose of Hudson NZ2013. No. 2 Hangar. Air Force Museum of New Zealand.
    Air Force Museum of New Zealand
    Hudson
    NZ2013
  • MUS0005322
    Air Force Museum of New Zealand
    Looking aft up the Navigator's accessway into the cockpit in Hudson NZ2013. No. 2 Hangar. Air Force Museum of New Zealand.
    Air Force Museum of New Zealand
    Hudson
    NZ2013
  • MUS0005321
    Air Force Museum of New Zealand
    Pilot's seat and instrument panel in Hudson NZ2013. No. 2 Hangar. Air Force Museum of New Zealand.
    Air Force Museum of New Zealand
    Hudson
    NZ2013
  • MUS0005320
    Air Force Museum of New Zealand
    Pilot's seat and instrument panel in Hudson NZ2013. No. 2 Hangar. Air Force Museum of New Zealand.
    Air Force Museum of New Zealand
    Hudson
    NZ2013
  • MUS0005319
    Air Force Museum of New Zealand
    Pilot's seat and instrument panel viewed from the Radio Operator's position in Hudson NZ2013. No. 2 Hangar. Air Force Museum of New Zealand.
    Air Force Museum of New Zealand
    Hudson
    NZ2013
  • MUS0005318
    Air Force Museum of New Zealand
    Pilot's seat and instrument panel in Hudson NZ2013. No. 2 Hangar. Air Force Museum of New Zealand.
    Air Force Museum of New Zealand
    Hudson
    NZ2013
  • MUS0005317
    Air Force Museum of New Zealand
    Pilot's seat and instrument panel in Hudson NZ2013. No. 2 Hangar. Air Force Museum of New Zealand.
    Air Force Museum of New Zealand
    Hudson
    NZ2013
  • MUS0005316
    Air Force Museum of New Zealand
    Radio Operator's position in Hudson NZ2013. No. 2 Hangar. Air Force Museum of New Zealand.
    Air Force Museum of New Zealand
    Hudson
    NZ2013
  • MUS0005315
    Air Force Museum of New Zealand
    Radio Operator's position in Hudson NZ2013. No. 2 Hangar. Air Force Museum of New Zealand.
    Air Force Museum of New Zealand
    Hudson
    NZ2013
  • MUS0005314
    Air Force Museum of New Zealand
    Pilot's foot pedals and compass in Hudson NZ2013. No. 2 Hangar. Air Force Museum of New Zealand.
    Air Force Museum of New Zealand
    Hudson
    NZ2013
  • MUS0005313
    Air Force Museum of New Zealand
    Pilot's foot pedals in Hudson NZ2013. No. 2 Hangar. Air Force Museum of New Zealand.
    Air Force Museum of New Zealand
    Hudson
    NZ2013
  • MUS0005312
    Air Force Museum of New Zealand
    Pilot's position and instrument panel in Hudson NZ2013. No. 2 Hangar. Air Force Museum of New Zealand.
    Air Force Museum of New Zealand
    Hudson
    NZ2013
  • MUS0005311
    Air Force Museum of New Zealand
    Pilot's position looking at the foot pedals and part of the instrument panel in Hudson NZ2013. No. 2 Hangar. Air Force Museum of New Zealand.
    Air Force Museum of New Zealand
    Hudson
    NZ2013
  • MUS0005310
    Air Force Museum of New Zealand
    View looking back from the bomb aimer's position, in the nose of Hudson NZ2013. No. 2 Hangar. Air Force Museum of New Zealand.
    Air Force Museum of New Zealand
    Hudson
    NZ2013
  • MUS000533
    Air Force Museum of New Zealand
    Navigator's position, viewed through the perspex nose cone, in Hudson NZ2013. In No. 2 Hangar. Air Force Museum of New Zealand.
    Air Force Museum of New Zealand
    Hudson
    NZ2013
  • MUS000532
    Air Force Museum of New Zealand
    Navigator's position, viewed through the perspex nose cone, in Hudson NZ2013. In No. 2 Hangar. Air Force Museum of New Zealand.
    Air Force Museum of New Zealand
    Hudson
    NZ2013
  • MUS000531
    Air Force Museum of New Zealand
    Navigator's position, viewed through the perspex nose cone, in Hudson NZ2013. In No. 2 Hangar. Air Force Museum of New Zealand.
    Air Force Museum of New Zealand
    Hudson
    NZ2013
  • MUS000539
    Air Force Museum of New Zealand
    View of the left (port) side of the Navigator's position, in the nose of Hudson NZ2013. No. 2 Hangar. Air Force Museum of New Zealand.
    Air Force Museum of New Zealand
    Hudson
    NZ2013
  • MUS000538
    Air Force Museum of New Zealand
    View looking forward from the Navigator's position, in the nose of Hudson NZ2013. No. 2 Hangar. Air Force Museum of New Zealand.
    Air Force Museum of New Zealand
    Hudson
    NZ2013
  • MUS000537
    Air Force Museum of New Zealand
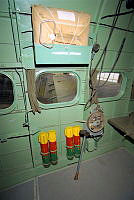
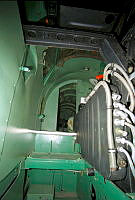
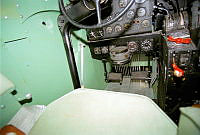
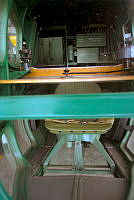
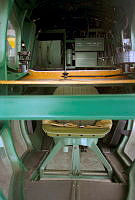
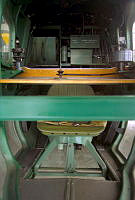
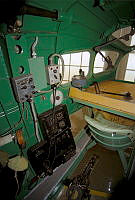
    Buoy (?) release on the left (port) side, beside the bomb aiming position, in the nose of Hudson NZ2013. No. 2 Hangar. Air Force Museum of New Zealand.
    Air Force Museum of New Zealand
    Hudson
    NZ2013